Sunday, April 28, 2013

Fellow's Fresh-Ups for Your Space

Occasionally I look at my space - be it home, office or other - and I think to myself, "I have GOT to do something to spruce this up." It goes without saying I don't have the time or the budget to be repainting or redecorating my rooms every few months, so to meet the need within my means, I use what I call a "fresh-up."

Check out these trends that are easy on the wallet and even easier to create.

Stick It
Nature-inspired decor can be spotted in many home style shows or magazines. I'm a big fan of this trend to bring the great outdoors in. Along these lines, these twig pencils are just the rustic chic touch you need. Arrange them in a glass jar on your desk or coffee table. Not to mention they're also real pencils and under $6. Winning!
SOURCE: Amazon.com 


Switch It
Most of your light switch plates and outlet covers are probably plastic and boring. Pick a switch that gets lots of flicks - the entry way, guest bathroom or other - and perk it up with a pretty plate. Options abound at big box home improvement stores, but for something unique, try one of these options.


  • Visit www.Etsy.com and search "light switch cover." The ones pictured here are from the ShampaneShop on Etsy
  • Stop by an antique shop or consignment store that offers lighting fixtures and accessories.
  • Make one! With the right print paper or fabric and some glue, you can fashion your own. It's so easy I won't bore you with the how-to...you're smart kids.

Frame It
I saw this display in a home decor store in Napa Valley. For an interesting installment, mix styles and shapes of photos frames and fill them with patterned paper. Your local craft or scrap booking store will have lots of paper options. Arrange the frames on a shelf, mantel or side table. 


Spray It
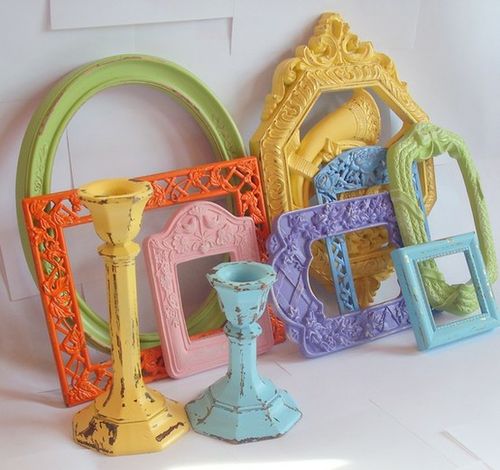
Never underestimate the power of spray paint, people. For a few bucks, you can make anything look different or brand new. My mom was an avid sprayer: tables, chairs, baskets...if it wasn't nailed to the floor, she'd spray paint it, and I used to think she spent half of her time high on the fumes. I didn't understand her motivation back then, but looking back, I can appreciate her thriftiness.

The example photo here, sourced from imgfave on Pinterest, shows bright colors. White also makes a statement and gives a modern touch. Frames, candle holders, figurines, jars...take a look around your home, and I guarantee you can find one thing that would become a bold conversation piece if spray painted. 

No matter the space or the budget, make one (or more!) of these "fresh-ups" your own. I'd love to see what you come up with.

Sunday, April 21, 2013

Pack It Up: It's Picnic Time!

There's nothing like al fresco dining. Italian for "outside, at a fresh temperature," taking a meal outside just implies a fun, casual approach to eating. 

I have absolutely no idea what is happening here...
but I want to be there.

When the time and the place is right, my favorite outdoor meal is a picnic. What I love about a picnic is that it's all about the planning and not about the effort. If you want to make incredible homemade treats for your picnic, you certainly may. Or, if you want to simply organize and enjoy the fruits of your non-labor, outsource that s***.

GREAT PICKS FOR PICNIC FARE
  • Assorted cheeses, cured meats, crackers
  • Olives, pickles and nuts
  • Grape leaves, hummus and other Mediterranean nibbles from the deli
  • Pre-made pasta salad, cous cous or potato salad
  • Tuna or chicken salad (add a little curry to give these a new 'zip')
  • Ingredients for guests to make their own sandwiches: assorted cold cuts, cheeses, breads, lettuce, tomato and a few mustards, mayos and other sandwich spreads
  • Pick up a frozen pound cake from the grocery; allow it to thaw. Bring whipped cream, hazelnut spread (like Nutella), chocolate syrup and fresh berries for toppings.

Our recent Napa Valley picnic. I learned that the more wine
you drink, the more fabulous you think the picnic is.

PICNIC PACKING TIPS

  1. As with any outdoor meal, be aware of temperatures. For chilled foods, make them ahead and store them in an ice-packed cooler. On ice, these foods can safely last for 4 - 6 hours (if not longer) without being compromised. 
  2. In lieu of ice, use frozen ice packs. They won't make a soggy mess out of your picnic cooler. If you do use ice, place each of your food containers in a seal-able plastic bag, like a quart or gallon-size plastic zipper bag. This will ensure they stay dry.
  3. Don't forget the essentials: plates, cups, napkins and cutlery. Bringing the real stuff elevates the experience but disposable is acceptable, too. It's also nice to bring platters or bowls for serving. (I mean, if you didn't cook any of it, at least you can make it look pretty by arranging it on a plate, right?) Cutting boards are excellent for slicing and displaying foods. Make sure you also bring a sharp knife, wrapped in a dishtowel for safety.
  4. Finally, bring a blanket and a trash bag for your garbage. With these 2 items, you don't need tables or trash cans to determine where you lay out your spread.

The great thing about a picnic is that it can be as extravagant or as easy as you like. Whether it's bologna sandwiches or bolognese pasta, enjoy dining in the great outdoors at least once this season!

Sunday, March 31, 2013

Easter Inspiration

I've noted some busy bunnies this season sharing fantastic ideas for Easter inspiration!

First, these cute cupcakes hopped onto my Easter dinner table, courtesy of my friend Jill. She's one of those "I can do everything" girls, which would typically make you want to strangle her, but she's so sweet and genuine that you forget she's gorgeous, crafty and brilliant (she's an engineer). Her Bunny Rump Cupcakes, pictured below, were a hit, especially with the kids.

The last thing Elmer Fudd sees.

You can use any cupcake recipe you like. To create the cotton tail, Jill dipped a miniature marshmallow in water and rolled it in white sprinkles. She fashioned the feet out of white chocolate, but if you're not that crafty, your local craft & baking supply store might have supplies to help you out.

Next, I spotted these 2 gals taking their own spin on my "Rabbits Under Glass" idea. Jamie dressed up her glass jar and chocolate bunny with ribbon while Becca replaced the Easter candy with colorful eggs nested on pink grass. Both came out great!


I suspect Jamie had to slap her husband Brian's hand a few times to keep him out of this adorable, edible display.


Becca's daughter Sophia calls this "Eggies Under Glass."

Be sure to save these ideas for next year's Easter season. Or, they're so easy, you might even be able to still pull them off today!

Happy Easter, friends. May this be a season of peace and a promise of spring to you and yours.

Friday, March 29, 2013

Rabbit Under Glass

It was almost an Easter disaster of epic proportions. How is the Easter bunny supposed to deliver eggs and baskets when he's headless? Alas, it happened, at my hand, in my dining room. 

Thankfully, the headless rabbit was repaired after a few seconds in the microwave, which melted his head back to his body, and Easter was saved!

Okay. Maybe I'm exaggerating a little bit. And if you think I put a real rabbit in the microwave...ew.

Here's what really happened:

No real bunnies were harmed during the set up for this photo.

But, as earlier reference, I saved this bunny, put him back with his colony of fellow chocolate friends, and continued making my Easter display.

I came up with this idea after seeing jars of jelly beans on display in a store. If you could display jelly beans in a jar, why not other Easter candy? And, what if that jar was an apothecary jar?

I call this "Rabbit Under Glass."

Here's the great thing about this Easter table top display: not only is it fun to look at, but once everyone has seen it, the kids (or all of you big kids out there) will enjoy eating it. Typically, kids (and again, some of you big kids) are told "Don't touch!" Can you imagine the look on their faces when you tell them to dig into this? Beats the heck out of looking for plastic eggs filled with pennies.

And - just like everything I feature on my blog - this was super easy. Apothecary jars, Easter candy, arrange, done. Fab in a flash.

Regardless of your Easter plans, this will sweeten them right up.

Wednesday, March 27, 2013

Deviled Eggs Done Delicious

Deviled Eggs were an acquired taste for me. When I was young, I dismissed deviled eggs by putting them in the category of "old lady foods." This category included any lemon dessert (ew) and that cold broccoli salad with bacon, raisins and mayo (yuck). If this is still the case...well, then I've turned into an old lady. Starbucks' lemon loaf is one of my favorites, and whenever there's a family pitch-in dinner, I'm the first in line for the broccoli salad.

Easter is a popular time for deviled eggs, either because they're served with the Easter meal or because it's a great way to use up those dyed Easter eggs.

Now, I did my research to bring you a simple & tasty Classic Deviled Egg recipe. Plus, I added 2 more twists of my own creation in case you want to stray from the every day. All will be a hit on your table, I assure you.

First, let's boil these babies. According to the American Egg Board, here's the way to a perfect hard-boiled egg:

  • Add 1 dozen eggs to your saucepan or stock pot and add water until the eggs are just covered.
  • Bring water to a boil, then cover.
  • Remove pan from heat and let stand for 12 minutes.
  • Done!
After the eggs have cooled, peel off the shell, cut them in half and reserve the egg halves while placing the yolks in a bowl.


Photo courtesy of www.tasteofhome.com
CLASSIC DEVILED EGGS

12 hard boiled eggs
1/2 cup + 1 tbsp mayo
1 tbsp of Dijon mustard
Fresh dill

Mash the 12 egg yolks. Mix in mayo and mustard with yolks. Add salt & pepper to taste as desired. You may also add 1/4 - 1/2 tsp of olive oil for a smoother consistency. Pipe (using a plastic baggie with the corner snipped) or spoon in the egg halves. Top with fresh dill.


GREEN EGGS & HAM
  • Instead of mustard, sub in 1 tbsp of prepared pesto
  • Instead of dill, top with fried prosciutto

FIREY DEVILED EGGS
  • Instead of mustard, sub in 2 tbsp of Sriracha Hot Chili Sauce
  • Add more Sriracha to taste if you like it blazin'
  • Instead of dill, top with green scallions

Daddy likey his Deviled Eggs hot!

Tuesday, March 26, 2013

Take A Peep

Easter is the single most important holy day of the Christian Church, as it celebrates the resurrection of Jesus Christ. Additionally, the Orthodox Church celebrates Easter in correlation with the Jewish Passover during the same season.

But, since you're on Fellow Does Fab, I'm pretty sure you didn't come here for religion class. So, let's talk about the really important things...like Easter wreaths made out of Peeps. Yep, I said Peeps wreaths. 

Peeps have over a quarter of a million "Likes" on Facebook. (I'd kill for half of that, and Fellow Does Fab is a real person, while these are marshmallow creatures with no soul. I say that because have you ever looked into that dark, brown, irregular chocolate dot called a Peep eye? No soul.) 

Over 700 million Peeps are sold each year.
That's basically the population of Europe.
So, the next time you bite the head off of a Peep, think of a European.

You either love Peeps or you tolerate them. Truth be told, the texture and taste doesn't do much for me, but I sure do like to watch those little buggers puff up when you cook them in the microwave!

That said, just because you don't like to eat Peeps doesn't mean you can't enjoy them this Easter season. If you've seen a Peep wreath, it's a fun sight to behold. When I saw one of my friends had mastered the task, I asked if I could share her tricks of the trade, and here they are.


TRELA'S PEEP WREATH
-1 plastic-wrapped straw wreath from the craft store
-Toothpicks
-Approximately 100 PEEPS (25 - 4 packs)

Gently bend the 4-pack of Peeps to follow the circle of the wreath, and attach them using 1 toothpick per Peep. (It's not necessary to separate each Peep from the 4 pack, as allowing them to stick together actually works better.)

Start by placing Peeps on the INSIDE of the wreath first, and once you finish the first inner circle, work your way out.

You should be able to complete your Peep wreath in about an hour. After, allow it to lay flat for at least 2 - 3 days undisturbed, and the Peeps will harden on the toothpicks. Hang wherever you need a ray of Easter Peep sunshine. 

Who says marshmallows are all fluff?

Saturday, March 16, 2013

Top O' The Tortilla To Ye!

Happy (almost) St. Patrick's Day! I think there's a little Irish in my ancestry, but regardless of my roots, everybody is Irish on St. Patrick's Day. Any excuse to drink beer and engage in festive frivolity, right?

That said, I found an excellent idea to pass along to roll out the green carpet for this year's leprechaun-y holiday.

I've often made my own homemade tortilla chips because they're easy, tasty and most often more heathful than fried tortilla chips. Flour tortillas can be easily transformed into chips by cutting them into triangles, spraying with oil, adding your own seasonings and baking in the oven. Bam.

Now, David Dial over at the cool blog SpicedBlog.com has taken this idea to the next level by - wait for it - using cookie cutters to theme your tortilla chip shapes. Brilliant! David uses spinach tortillas to keep his shamrock chips green for St. Pat's. He also has a ton of amazing Irish-inspired recipes posted for the season, so check those out as well.

Cut into shapes, spritz with cooking oil or brush with olive oil, and sprinkle
with salt and pepper.

Bake in a 350 degree oven for 5 - 10 minutes, until the chips are crisped (but not browned).

I'll be using this idea for many more holidays as well. Think about bunnies at Easter, stars for your Oscar party, hearts at Valentines, pumpkins in the fall...the possibilities are endless. 

Hope you enjoy this little tip as much as I did.

Slainte!